| Volcanic Repeating Arms
From Wikipedia
The Volcanic Repeating Arms
Company was a company formed in 1852 by partners Horace Smith and Daniel
B. Wesson to develop Walter Hunt's Rocket Ball ammunition and lever action
mechanism. Volcanic made an improved version of the Rocket Ball ammunition,
and a carbine and pistol version of the lever action gun to fire it. While
the Volcanic Repeating Arms Company was short lived, it's descendants,
Smith & Wesson and Winchester Repeating Arms Company, became major
firearms manufacturers.
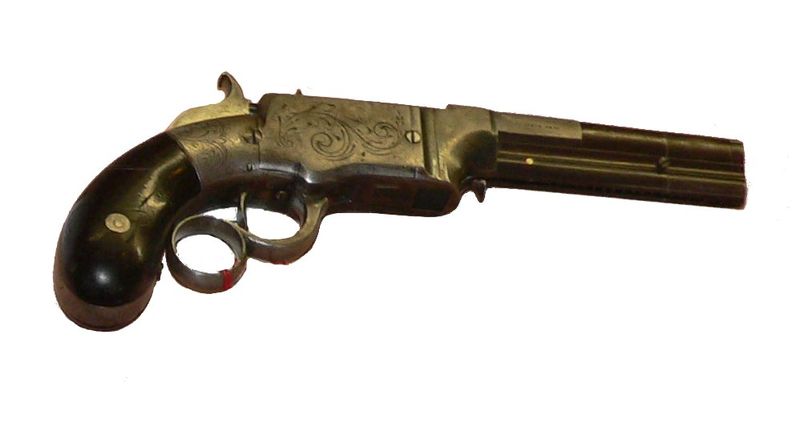
A Smith and Wesson Volcanic pistol,
circa 1855, in .31 caliber |
History
The original 1848 "Volition Repeating
Rifle" design by Hunt was revolutionary, introducing an early iteration
of the lever action repeating mechanism and the tubular magazine still
common today. However, Hunt's design was far from perfect, and only a couple
of prototypes were developed. Lewis Jennings patented an improved version
of Hunt's design in 1849, and versions of the Jenning's patent design were
built by Robbins & Lawrence Co. (under the direction of shop foreman
Benjamin Tyler Henry) and sold by C. P. Dixon until 1952, when financial
troubles ceased production.
The Jennings (top) and Volcanic
(bottom) rifles
In 1854, partners Horace Smith and
Daniel B. Wesson purchased the Jennings patent rights, and further improved
on the operating mechanism, developing the Volcanic pistol, and a new Volcanic
cartridge. Production resumed, still under the supervision of the Jenning's
foreman, B. Tyler Henry. The new cartridge improved upon the Hunt Rocket
Ball with the addition of a primer. Originally using the name "Smith &
Wesson Company", the name was changed to "Volcanic Repeating Arms Company"
in 1855, with the addition of new investors, the principle investor in
the new company being Oliver Winchester. The Volcanic Repeating Arms Company
purchased all rights for the Volcanic designs (both rifle and pistol versions
were in production by this time) from Smith and Wesson, who left the company
soon after, to found another "Smith & Wesson". The company was moved,
and in 1860 was reorganized as the New Haven Arms Company--still under
the supervision of foreman B. Tyler Henry. While continuing to make the
Volcanic rifle and pistol, Henry began to experiment with the new rimfire
ammunition, and modified the Volcanic lever action design to use it. The
result was the Henry rifle. By 1866, the company once again reorganized,
this time as the Winchester Repeating Arms company, and the name of Winchester
became synonymous with lever action rifles.
Top: A Jennings patent version of Walter Hunt's Volition
Rifle, which fired the Hunt Rocket Ball cartridge. Note percussion cap
hammer, as the Rocket Ball was externally primed. Bottom: A Volcanic Repeating
Arms Company lever action rifle, firing the improved, internally primed
Volcanic cartridge. The Henry Rifle uses the same design, adapted to rimfire
ammunition.
History of Rimfire Cartridges
From Wikipedia
The first rimfire cartridge was the .22 BB Cap, which
used no gunpowder by relying entirely on the priming compound for propulsion.
Dating back to 1857, the .22 BB Cap is essentially just a percussion cap
with a round ball pressed in the front, and a rim to hold it securely in
the chamber. Velocities are very low, comparable to an airgun, as the round
was intended for use in indoor shooting galleries. The next rimfire cartridge
was the .22 Short, developed for Smith and Wesson's first revolver; it
used a longer rimfire case and 4 grains (260 mg) of black powder to fire
a conical bullet. This led to the .22 Long, with a longer case and 5 grains
(320 mg) of black powder. The .22 Long Rifle is a .22 Long case loaded
with a longer, heavier bullet intended for better performance in the long
barrel of a rifle. The .22 Long Rifle is the most common cartridge in the
world. While larger rimfire calibers were made, such as the .41 Rimfire
Short, the .44 Henry Flat devised for the famous Henry Repeating Rifle,
up to the .58 Miller, the larger calibers were quickly replaced by centerfire
versions, and today the .22 caliber rimfires are all that survive of the
early rimfires. The early 21st century has seen a revival in interest in
rimfire cartridges, with two new rimfires introduced, both in .17 caliber
(4.5 mm).
Rocket Ball From Wikipedia
The Rocket Ball was one of the earliest forms of
metallic cartridge for firearms, containing bullet and powder in a single,
metal cased unit.
| Construction
The Rocket Ball, patented in 1848 by Walter Hunt, consisted
of a lead bullet with a deep hollow in the rear, running a majority of
the length of the cartridge. The hollow, like that of the Minie ball, served
to seal the bullet into the bore, but Rocket Ball put the cavity to further
use. By packaging the deep cavity with powder, and sealing it with a cap
with a small hole in the rear for ignition, the Rocket Ball replaced the
earlier paper cartridge with a durable package capable of being fed from
a magazine. The cap was blown out of the bore upon firing, leaving no cartridge
case to be ejected, making the Rocket Ball a form of caseless ammunition.
The Rocket Ball was used in the earliest magazine fed lever action guns,
allowing the first practical repeating, single chamber firearms.
Use
The Jennings rifle, top, shows the hammer and nipple needed
for the Rocket Ball's external percussion cap. The later Volcanic rifle,
bottom, used the internally primed Volcanic cartridge
The Jennings rifle, top, shows the hammer and nipple
needed for the Rocket Ball's external percussion cap. The later Volcanic
rifle, bottom, used the internally primed Volcanic cartridge
While the Rocket Ball provided the means of making practical
repeating firearms, it was not an ideal solution. The limited volume in
the base of the bullet severely limited the amount of powder that could
be used, and thus limited the potential velocity and range of the cartridge.
Despite these limitations, the Rocket Ball was used in a number of attempts
at making a commercially successful firearm, culminating in the Volcanic
Repeating Arms Company. The Volcanic cartridge went one step further, adding
a primer to the cap of the Rocket Ball, making the ammunition completely
self contained. |
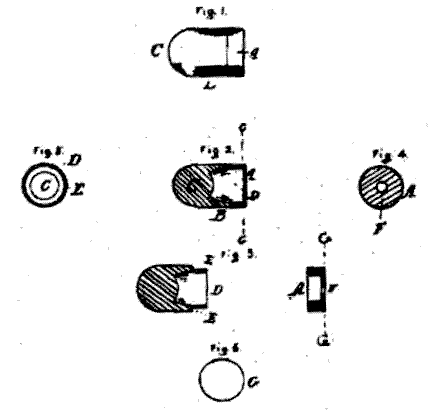
Drawing from US patent 5,701, for
Walter Hunt's Rocket Ball metallic cartridge |
|
| Reloading Bottleneck and Long Tapered Rifle
Cases by Cliff Hanger
Those of us that reload bottleneck
and long tapered rifle cases have at some time had rounds that would not
chamber correctly. We use the right die set but yet the rounds lack about
1/8" of entering the chamber completely. In rifles usually the levering
advantage will force the round home. But in pistols the round rim sticks
up out of the cylinder and requires a lot of force that may not seat the
round full. Now the pistol cylinder will not rotate.
What's going on?
Well, my opinion is that during
the reloading process the crimping process is the culprit. When the die
rolls over the brass in to the crimp groove, the brass is being swaged
from one diameter to a smaller diameter. This process causes the brass
to form a slight bulge about 1/16" to 1/8" below the neck of the case.
Now you say , "I don't have problems with my straight case rounds." Actually
you do. But the crimp die for straight cases have an advantage that the
tapered dies do not. As the brass is rolled in to the crimp groove, the
brass does bulge but as the case is straight the die hold the brass to
it's maximum diameter. Also when pulling the round out of the die it full
length sizes the round at maximum spec. diameter. So you really don't see
or have the bulged case. (Yes I know, we can crimp even if there is no
groove in all lead bullets. The problem is the same.)
Bottleneck or tapered cases also
produce this bulge when the brass is crimped in to the groove. But when
the round is pulled out of the die the die side walls move away from the
brass as the die gets bigger for the large bases of the cases. This process
does not resize the sides of the case leaving this slight bulge.
You may not see this slight bulge.
But if you measure the case about 1/4" down from neck then move the calipers
up they will open up slightly as they go over this bulge. It is enough
something to stop the rounds from chambering correctly. I have seen from
no bulge at all to as much as .004"
If you load a lot of these bottleneck
cases and long tapered cases for cas, you probably don't check the overall
length and trim those found to be a little long. I know I don't. I only
check for overall loaded length.
So what can we do if you have this
problem? I'll tell you what I do. And No I do not use a "Factory Crimp
Die". I use standard reloading dies. But not as you might use them.
So let's see if I can get through
this one step at a time:
1. Toss the brass to be loaded in
to the tumbler. I have a mechanical 4 hour windup timer. I paid $12.00
for it at a electrical wholesale house. It runs 3 to 3.5 hours a day. 4
days a week. Some times twice a day. The cheap electric ones from the hardware
store just don't hold up under daily use. The plastic turn off/turn on
pieces break.
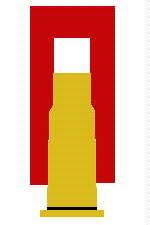
| 2. I set my press up
for the caliber to be done. I have an extra tool head that I keep handy
on the shelf. In this tool head I put a sizing die with NO
decapping pin. I run it all the way down
to the shell plate pre die instructions. Case Lube. I use Honaday
One Shot spray lube. Doesn't take much and you don't have to get all the
way around every case. I place the brass about 200 at a time in a 3 gallon
bucket and give a quick shot. Then I shack the bucket and give one more
spray. I let them dry before putting them on the press. I now resize all
the brass to spec. |
 |
3. Once this is done, I toss the brass
back in to the tumbler for about 1 hour. This gets the case lube off and
makes shinny cases.
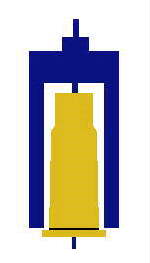
| 4. With a full toolhead
on the press, I start the normal reloading process.
However, I do not want to stick
any of these cases in the sizing die which without lube will happen. So
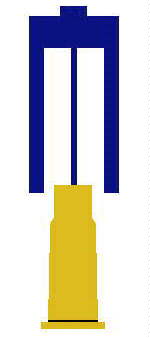
in station one, I use a Universal Decapping die instead of a sizing die.
It will accept rounds up to 45-70 without touching the case outside walls.
It only pushed the spent primers out. The rest of the loading process is
normal. |
  |
5. Powder is measured and dropped using
your standard methods.
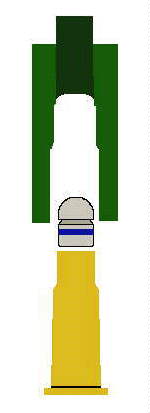
| 6. Next you place your bullet of
choice on the case and seat it.
If you are using Dillion dies, you
adjust the seating of the bullet per their instructions.
If you are using any of the many
Bullet Seating/Crimping dies you adjust them per their instructions.
I use Lee dies because I like them.
Also by using the combination die, it frees up one station in the toolhead.
The reason for this will be explained later. |
 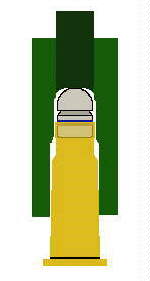 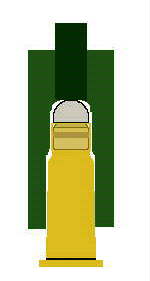 |
| 7. Which ever die set you use, the crimping procedure
is about the same. The round is run up in to the die and at the top of
the stroke the brass is swaged in against the bullet and the top of the
case is rolled in to the crimp groove.
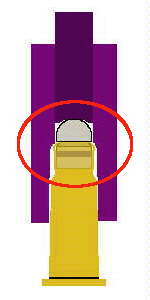
This is where the bulge in the case comes from. Noted
on drawing.
When the case is withdrawn from the crimping die the die
sides move away quickly leaving the bulge.
At this point you have a loaded
round but most likely have this slight bulge issue. If your guns will take
these rounds then you're done. If not, then we go on.
|
 |
Now for the magic! I have one more
step to do.
| 8. My press allows me
to put one more die in the toolhead after the crimping station because
I use the Lee Seating/Crimping die. They do the job and are cheaper then
other dies. I use Dillion presses. But the press is just a personal preference.
What I do is put a sizing die in
the last station. Remember I have NO decapping pin in the die as I used
it is step 2. I place it in the last station in the toolhead but I do not
run it down. I raise the loaded round up to the top of the press stroke.
I then screw the resizing die down as tight as I can get it by hand. I
lower the round a little and then turn the sizing die 1/2 turn. Run
the round up in to the die. I remove the round and inspect it with my calipers.
I am looking for the bulge. If it is still there, I return the round to
the press and turn the sizing die down 1/4 turn and do the process again.
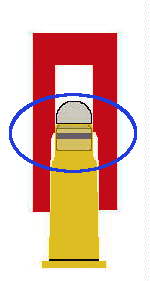
There will be a point where the bulge will be flattened out and in line
with the rest of the case on the side of the bullet but not touch the rest
of the case. If you screw the die in too far you will be resizing the bullet
in the case. We don't want that. We want just enough to remove the bulge
at the neck of the case.
.
If your press does not have enough holes in the tool
head to include the last step. Don't worry. Just like the first sizing
step, just put the toolhead with just the sizing die in it back on the
press. Sure you will have to run the rounds through the press a third time.
But the benefits at the range of not worrying if your rounds will chamber
is worth every minute you spend at the press. Oh! One more thing. During
the First sizing step and if you have to run the rounds through the press
a third time, make it easy on yourself. You're not pushing the primers
out so put the sizing die in the easiest station to put round in. I use
station 4 on Dillion 650s. When I have to put loaded rounds in the press
this is the easiest station to do that. It is where you usually place the
bullets on the case.
.
Now go out and shoot smaller groups without fighting
the Bulge! |
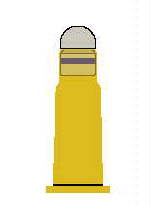
Finished Round
with NO bulge
|
|