| Making, Loading, and Shooting Paper Patched
Bullets by
Brent Danielson brentd@iastate.edu
I make and use Paper Patched Bullets
for elk hunting and target shooting. They are made with Corbin swaging
dies and a Corbin Series II press using extruded, pure lead wire. They
are 45 caliber bullets shot from my .45-100 Shiloh Sharps exclusively with
black powder. While it has once or twice been said that any gunpowder other
than black powder is just a passing fad, the same is true of any bullet
that is not paper patched. Sixty million dead buffalo and countless
elk, antelope, deer, etc. prove it. So, catch up to the technology
of the 19th century. Its now the 21st century, and you are falling
further and further behind. There ain't much time left.
These bullets are an original and several replicas of the Sharps Long Range
Bullet. The original was made with a 16:1 Lead: Tin alloy.
 |
To begin, there are three types
of paper-patched bullets (let's call them PPB's for short). The Chase patch
and the crosspatch methods are strictly for breach seated cartridge target
rifles or for muzzle loading target rifles equipped with false-muzzles.
I only use the third and most common method, the twice-wrapped bullet that
is seated into a brass cartridge. This type of bullet was used by
buffalo hunters 130 years ago, and works just as well today as it did back
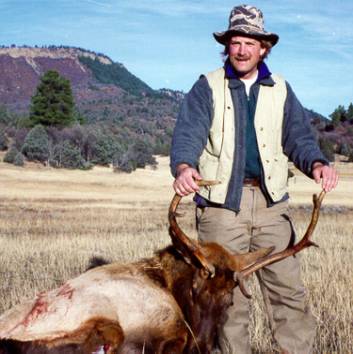
then. It is the ultimate hunting bullet in my opinion, but if you don't
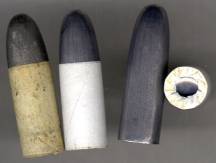
believe me, ask the New Mexican elk in the photo to the left or read Paul
Matthews' book "The Paper Jacket." It is, by far, the best reference book
you can get on paper patching. |
 |
Swaging, casting, and buying bullets
To begin with, you need to make
or buy a bullet. Montana Precision Swaging sells parallel-sided bullets
in 40, 45, and 50 calibers. They are of a slightly hard lead-tin alloy
and with only cupped bases and 1e round noses. MPS will make pure lead
bullets if you ask however. MPS also sells a tapered spire point bullet
with which I have never been able to hit anything. It is, however, something
that might work in another rifle. MPS is well advertised in the Single
Shot Exchange or the Black Powder Cartridge News. Of course, you can cast
bullets and lots of folks will make you a mold, but I don't cast; 'nuff
said.
While I have had decent results
with both .452" and .450" bullets, I decided to make my own bullets in
a .443" diameter. My patching material (Eaton's 9 pound airmail paper,
25% rag) will add .007" of diameter to the bullet, making my finished projectile
exactly bore diameter. I believe that most, if not all, of the original
buffalo rifles shot bullets that, as patched, were bore diameter or just
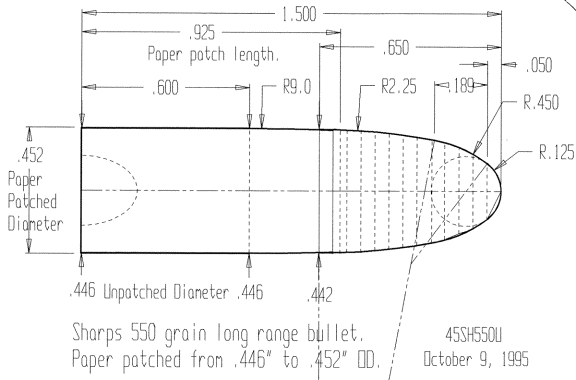
slightly more. I have it on the good authority of Dr. Dick Gunn that Sharps'
paper-patched, long-range and hunting bullets were designed to be about
.002" greater (as patched) than bore diameter, but considerably less than
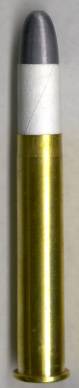
the typical .458" groove diameter. A drawing, by Dick, of an original Sharps
45-550 is shown in the figure below. These bullets were designed to be
thumb-pushed directly into the bore of rifles with very short or nonexistent
throats. |
Sharps Long Range Bullet.
This was drawn from an original Sharps long range bullet such as that shown
on the left side of the first photo on this webpage. Note that over
half of this bullet's nose is unsupported. It was originally made
in 16:1 Lead: tin alloy and was therefor Probably quite resistant to slumping.
Pure lead versions of this will only shoot about 1.5-1.75 for me at 100
yds.
My bullets are loaded out as far
as possible. In fact, in target rounds, I have only 0.09" of the bullet's
base in the case. This is pretty close to breech seating, and it certainly
allows for near perfect bullet alignment when the cartridge is chambered.
Larger bullets of the .450-.452" variety, will be .457-.460" when finally
patched. These bullets must be seated deeper in the case, which conflicts
with my belief that more powder is better. More importantly, it also means
the bullet and patch must navigate the throat in a perfectly straight line.
It can be done, and is done regularly, but it is not the optimal solution
in my opinion.
Determining patch length and width
A good way to get an estimate of
what you need for patch length, is to wrap the bullet 3 times in a single
strip of wet paper. Let it dry. Then take a razor and cut through all three
wraps at one location along the edge of the bullet. Just a 1/8" long cut
is fine, don't cut the entire length of the patch. Unwrap the bullet. The
distance between two successive slices is twice your bullet's circumference.
You will want your cutting pattern to be shorter than distance just a bit
to compensate for the stretch you will produce in rolling, but do that
by eye, after trying a few wraps with patches made from the initial cutting
pattern. If the cutting pattern you buy is like mine, brass and too long,
it is pretty easy to trim with a file or even a guillotine paper cutter.
However, I don't worry overly much about exactly matching patch length
to bullet diameter as I've found that patches cut with the same pattern
will wrap equally well a .440, a .443, and even a .450, and .452 by simply
learning to stretch the paper just the right amount. Practice helps, and
I do a lot of it, but the point is, you don't have to have a different
cutting pattern for every bullet diameter you want to try. I've only owned
one such pattern so far.
Also, if the cutter is wider than
your patch, that's fine. Don't trim it anymore. Patch width is determined
by the steel ruler that is used to initially cut the paper into strips.
To estimate the correct width for
the patch (and thus, for the steel rule that you will need; discussed below),
measure your bullet from the very beginning of the ogive to the base and
add maybe 0.15" or so, just enough that your patch will fold over the base
but NOT enough that it bunches excessively in thickly folded edges near
the bullet's center (refer to the photos above). Although I've heard of
folks that do well with long twisted tails tucked into hollow bases (or
sometimes clipped after drying), they require more paper and do not always
provide a perfect bullet base. Most importantly, if a twist or bunched
paper wad occasionally gets hammered into the base by the detonation of
the main charge, it may stick to the bullet and cause inaccuracies.
Cutting Patches
I use Eaton's 9 pound airmail paper
which has a 25% cotton rag content. I find it at the university's book
store, but you can probably get it lots of places. Whatever paper you decide
on, make sure it is a common paper or get a lifetime supply of it.
Personally, I think that this paper
is about as thin as anyone would care to use. There are certainly thinner
papers, but they are easily damaged when applied to the bullet or when
loading the finished bullet into cartridge or rifle chamber. Thicker might
be better to with stand fouling, but the bullet needs to be substantially
smaller if you want a finished product that is bore diameter. Thicker papers
have the additional downside in that they are just a little harder to wrap
on the bullet, especially if that bullet is tapered.
To cut the patches, I have a traditional
brass cutting pattern that I bought somewhere (Buffalo Arms or Montana
Precision Swaging has them). They work fine, but cutting all four sides
of the patch one at a time with the pattern gets old real fast. Instead,
I've found that the best way to cut patches is to use a steel rule that
is as wide as your patches need to be from top (bullet tip) to bottom (under
the base). Finding such a rule is the hardest part, but once you've got
one, you're set. I've describe how to find the proper patch dimensions
in the section above, but for a 500-525 gr bullet, a rule that is about
1" wide is perfect. Lay down 5-6 sheets of 8.5 by 11" paper on a cutting
board, and trim across the width of the paper from left to right with a
razor, pocket knife, Exacto knife, whatever. In about 2 minutes, you can
have 50-60 strips of paper 8.5" long and about an inch long in my case
from those sheets.
Then lay your typical cutting pattern
over a stack of the strips (~10-12 works for me), even up the base of your
cutting pattern and one edge of the stack of strips against the steel rule,
then cut the diagonals along the left and right edges of the cutting pattern.
I get two patches for a .45 from each 8.5" strip, plus some waste. In maybe
10-15 minutes, I can produce 250 or so patches, all while watching Monday
Night Football
too.
I've tried the guillotine paper
cutter, and I definitely ain't good enough. There may be better cutters
than the one I have, but I don't need anything faster than what I've described
above.
Wrapping
I moisten my patches, 4-5 at a time,
in a small bowl of plain water or water with just a touch of flour. Paul
Matthews also recommends an egg white and water solution. And, of course
there is just straight spit. The last is traditional and works best, but
putting one's fingers in one's mouth while alternately handling lead seems
not too bright for enlightened folk that hope to take this hobby into the
21st century. Plain water works well enough and is easiest. The flour or
egg mixtures are likely to cause more problems than they will solve.
I prefer to lay the wet paper right
up to, but not over, the ogive. This is one of the few advantages inherent
in shouldered bullets such as those in the photo to the right. These were
made with Corbin's LSWC swaging die. For smooth-shouldered bullets, patch
alignment is more difficult and you may want to make a rolling board jig
such as Paul Matthews describes in his book. I think patch alignment is
very important, esp. with lighter bullets. Corbin Calls these LSWC (Lead
SemiWad Cutters). They can be shot as is, or reformed in a point
forming die to make a smooth ogive bullet like the Sharps Long Range Bullet
in the first photo on this page.
Anyway, align the "pointy" corner and
long edge of the patch along the ogive/bullet-shaft boundary, and roll
the bullet and paper away from you. With a little practice, you will learn
to apply a light and even tension to the paper. When you have this down
pat, the two short edges of the patch, separated only by the intervening
layer of paper (caused by the second revolution of the bullet) will meet
perfectly along the length of the bullet's shaft.
Then, holding the bullet by the
nose in your right hand (for righties), fold the paper under by twirling
the bullet's base against the tips of the thumb and fore finger of your
left hand. Finally, stand the bullet firmly on its base to dry. Perfect!
When you are good at this, you can do 50-100 bullets by halftime of the
average Monday Night Football Game (btw, it is a little-known fact that
Monday Night Football was invented for the express purpose of adding background
noise to the paper-patching process, can't imagine what buffalo hunters
used in its stead).
Finally, because I strictly use
swaged bullets, my bullets are very smooth and very lightly coated with
swaging lube. As a result, I've never had any indication that my patches
stick to the bullets, although it is a hard thing to know. With cast bullets,
I've often wondered if a tiny bit of lube on the bullet before she is wrapped
would help with fliers... Something for you casters to try and report to
the BP-L mail list.
Loading techniques
I load my bullets in a single stage
press - the same press that I use to swage bullets, but I used to do it
all by hand with an original Ideal #3 tong tool, and later, with a pair
of Lyman 310 tong tools. I still use the latter a lot for priming and neck
sizing.
As with any black powder cartridge,
I drop my powder through a long tube to settle it uniformly into the case.
I often compress the powder further, but these are details not specific
to PPB's so I skip them here.
Just because your shooting a PPB
doesn't mean that you can skip lubing the bullet. If you do, you just might
wear the barrel out a lot faster than you had planned. I use Minuteman
lube, but SPG and others work well. One lube that does NOT work well, however,
is OxYoke, also sold as Natural Lube by Thompson/Center. This lube contains
mineral oil which soaks into the paper, softening it, and destroying it,
so far as the purposes of shooting are concerned. If your lube causes the
paper to turn translucent or appear wet, it probably won't work.
I apply the lube by rubbing a small
amount between my fingers and thumb and then twirling the patched and dried
bullet between them. Be careful to turn in the same direction that you
wrapped the patch to avoid stripping the patch off.
The other lube component for PPB's
is a grease cookie? Of course, some use them with those faddish, low-tech,
grease-grooved bullets, but the cookie is really in the province of those
that shoot according to the true faith. I find that the cookie is needed
to help seal the bore when shooting my bullets that are only bore diameter
after patching. If I don't, gases, blowing by at very high velocities,
tear the patch, destroying it, and my hope of decent accuracy at the same
time. If you are shooting groove diameter bullets that are firmly seated
into the chamber throat, you may not need a cookie IF you plan on wiping
between shots.
My cookies are made from Minuteman
Lube with about 20% beeswax added to stiffen it slightly. SPG or any of
the other commercially available lubes work well for some folks, as do
numerous home brews such as 50-50 concoctions of beeswax and olive oil
or whatever. Experimentation is the key here. Historically, the lube recommended
by the original Sharps company was a 1: 2 ratio of beeswax and sperm oil
If you can find it, sperm oil just might work magic. In any event, I extrude
my cookie material out of a lube ribbon extruder. You can get one from
Montana Precision Swaging, Buffalo Arms, or make one yourself. Even easier,
lay a piece of wax paper on a table, put a dollop of lube in the middle
of it and two sticks of appropriate thickness on either side (I found paint
stir sticks to be perfect). Put another piece of wax paper over the top
and then roll the lube with a rolling pin, beer bottle, whatever, until
the lube is the thickness of the sticks.
To cut the cookie, I first place
a wad cut from a paper milk cartoon over the compressed powder. This wad
is necessary to keep the oils from soaking into the powder column. Then,
I simply invert the case and cut the cookie with the case mouth. To seat
the cookie down on the wad, I put a second wad (usually a 0.06" vegetable
fiber or another milk carton wad) over the cookie. This wad keeps the cookie
from sticking to the bullet's base. I push this second wad and cookie down
into the case with a small dowel. Sometimes, compressed air will lift the
grease and the second wad up after seating. If this is a problem, slice
the edge of the cookie with a pen knife to allow gas to escape. The slice
will seal back up when you put pressure to the cookie sandwich with the
dowel.
Because my bullets are so thin,
I neck size all my cases to provide enough tension to hold the bullet.
It is just barely enough. I do not bell after sizing and I do not crimp.
I just seat the bullet with my fingers and thumb and I'm ready for the
range. Whatever you end up doing, you need the neck to be large enough
to get the bullet in without damaging it or the patch, and small enough
to hold the bullet reasonably straight until you get it in the chamber.
If you are shooting bore diameter
bullets, load them as far forward as possible. This means you will need
more powder, but so much the better to make smoke and noise, unless you're
an elk, of course.
Shooting paper-patched bullets
Now that you've got'em, how to shoot'em?
Well, pretty much like anything else. Load, aim, and fire. Of course, there
is a trick, but it's an easy one. Wipe between each shot. If you do, you
will find that accuracy is superb (1.25 to 1.5 moa with proper load development).
Even better, you will be shooting each shot just like it is the first shot,
the only shot, on that elk. I find that I need to wipe once with a wet
patch followed by one pass with a dry patch. This might use a few more
patches than you are used to, but I put my dirty patches in a net bag similar
to what women use to wash their hose it, and then toss them in the laundry
machine. They are better and easier to use the second time.
Of course, I wish I didn't have
to wipe between every shots, but I have yet to find a way to avoid it and
still achieve acceptable accuracy. Meanwhile, I continue to experiment
with new bullets (including my new replica of the original Sharps 45-550
long range bullet; top photo), different oils in the cookie (jojoba???),
and different paper (thicker?), but until then, wash your hands before
eating and your bore before shooting.
Of course, you are going to want
to carry these things in the field, maybe more than just the one in the
chamber too. The nay-sayers will tell you it can't be done. They're nuts.
First, if you really worry about water or dampness destroying your not-so-delicate
patches, you can waterproof them with Blair's #105 Spray Fixative (found
in most art supply stores and departments - avoid Krylon's equivalent -
it is reported to cause the paper to stick to the bullet - a BAD thing).
To apply the fixative, saturate a paper towel with the stuff and roll your
patched and dried bullets on the towel until the patch is well soaked.
Stand the bullet on its base and let dry again. Then, apply the lube. Personally,
I don't do this anymore. Just don't need it.
To carry cartridges in the field,
I put three or four in my vest. It's a surveyor's vest made by Filson,
and the left breast pocket has 4 compartments meant to hold pens or whatever
it is that surveyors need. They hold bullets, even really really long ones,
very well, and very accessible. If I need to carry more, and I usually
do, I put them in a case that I made from three pieces of ½" PVC
indoor water pipe cut to 4.5" lengths and then duct taped together to make
a cigarette-sized pack. More duct tape, doubled over, forms a flap that
can be rubber banded down, and a bottom. These things are all but bombproof,
and they bang around in my fanny pack until needed. A little paper toweling
or foam rubber shoved into the bottom of each tube will cushion the bullet's
tip and prevent it from sticking to the duct tape.
Reading patches
In diagnosing the performance of
my various loading experiments, I find it very useful to find the paper
remnants and "read" them. The outer wrap, and often the inner wrap, will
be sliced by the rifling right down to the bullet's base. If the rifling
is fairly shallow relative to the thickness of the paper, the inner wrap
will be intact. The patch should also be quite clean and white. If it,
or for that matter, the strips of the outer patch, are torn, then there
is a big problem somewhere. Either the patch was damaged when it was loaded,
or by fouling or a rough bore as it travels the length of the barrel. Whether
the rifling slices through just one or both layers of the patch seems not
to matter with regard to accuracy on the target. If the outer layer of
the patch is charred or badly discolored, there are probably hot gases
blowing by the bullet before the pressure wave obdurates the bullet to
completely fill the bore. This is bad and requires bigger bullets, thicker
paper, or better grease cookies.
Generally, the paper from the first
shot will be in fine condition because everything is nicely smooth. Rough
fouling will, however, cause damage to the patch as it is chambered or
as it travels the length of the barrel. I find that there is just a small
amount of tearing on the second shot, but by the third of fourth tearing
is severe and accuracy is terrible. Blow-tubing helps, but it is not a
panacea. Watching for patch tearing will tell you when you need to clean.
If you can't find any patch material,
there are three possibilities. The first is that you can't see them for
all the smoke. The little devils can be hard enough to track down and capture,
even when you know where they hit the ground. Have a friend watch from
off on the side. The second possibility is that the patch was consumed
before it cleared the muzzle. Pretty doubtful, but severe fouling or blowby
can cause this. More cleaning, better grease cookies, thicker paper, or
larger diameter bullets may help.
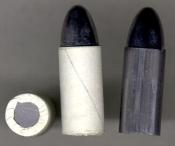
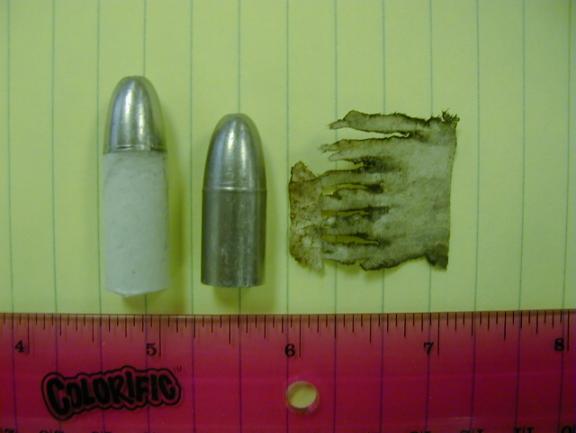
Bullet and burned patch. This
picture was sent to me by Larry Pletcher. It dramatically shows evidence
of blowby. Gasses, from the initial microseconds of ignition, blow
past the base of the bullet and up the grooves. This burns through
the paper like a hot torch. This is bad news.
Third, the paper may be sticking
to the bullet. The only way to be sure, is to dig a few out of the backstop.
If this is the case, try a little lube on the bullet BEFORE applying the
patch, or avoid all patch-wetting additives but water.
Shooting dirty AND accurately is
the holy grail for the paper patching rifleman. Better papers and lubes
might help us achieve decent accuracy while shooting dirty, but until we
have the famous powders of yesteryear, I think we will continue to be required
to wipe every 1-3 shots. Until we find the grail, (and please, please,
please let me know if you do), we have something to strive for (btw, for
me, "dirty and accurate" means no worse than 2 moa for 20-30 rounds).
Meanwhile, catch up to the 19th
century before the calendar roles over to the 21st. And, don't miss!
|