THE
PETTENGILL PERCUSSION ARMY REVOLVER
AND IT'S SIBLING
THE
RODGERS AND SPENCER PERCUSSION ARMY REVOLVER
by
David Radcliff |
| A TWO PART
RAMBLING OF TWO REVOLVERS WITH THE SAME FRONT END! |
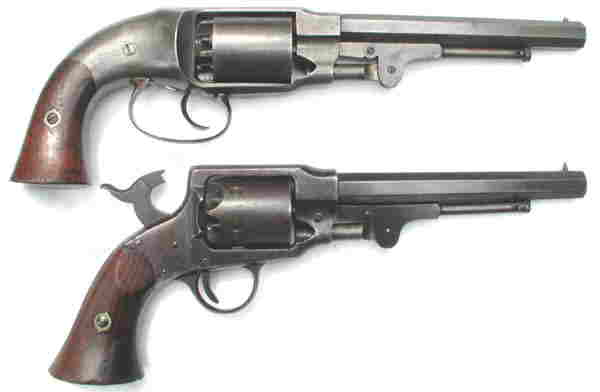
TOP: THE PETTENGILL
.44 CALIBER DOUBLE ACTION PERCUSSION ARMY REVOLVER
BOTTOM: THE RODGERS
AND SPENCER .44 CALIBER SINGLE ACTION PERCUSSION ARMY REVOLVER |
__________________________________________________________________________________________
PART
1
THE
PETTENGILL PERCUSSION ARMY REVOLVER |
On June 27, 1862, Edgar A. Raymond
and Charles Robitaille entered into a contract with the federal government
for 2,000 of their somewhat unusual revolver at price of $20.00 each. An
earlier contract for 5,000 of them had previously been canceled by the
Ordnance Department. It's pepperbox mechanism had been patented by C.S.
Pettengill of New Haven, Connecticut on July 22, 1856. It was improved
by a patent on July 27, 1858 submitted by Edgar A. Raymond and Charles
Robitaille of Brooklyn, New York and by a later patent by Henry F. Rodgers
of Willow Vale, New York on November 4, 1862. The revolver was manufactured
by Rodgers, Spencer & Company at their Willow Vale facilities. It preceded
the Rodgers and Spencer revolver by over two years which utilized the basic
frame front, loading lever assembly and barrel design of it's predecessor
and sibling, the Pettengill revolver of the type featured in this posting.
It was basically a weapon designed by committee and was to suffer the same
fate as many items so brought to production. It appears that there were
just too many cooks involved in the design and production of this arm.
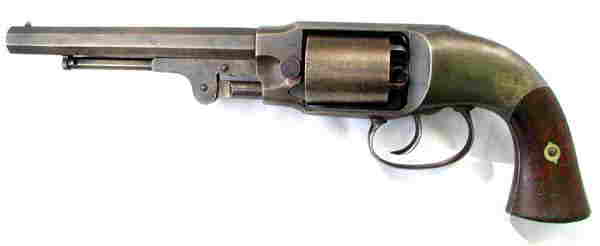
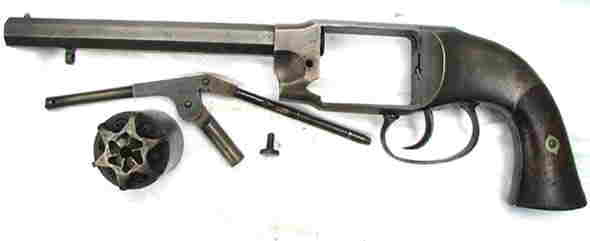
LEFT & RIGHT
SIDE VIEWS OF THE PETTENGILL .44 CALIBER DOUBLE ACTION PERCUSSION
ARMY REVOLVER |
A total of 1,500 Pettengill Army
revolvers were delivered in 1862 with another 501 being delivered in early
1863 making a total of 2,001 received by the government during the six
months before mid January of 1863. However, existing serial numbers,
ranging from 1600 to 4600, would indicate that about 3,000 were actually
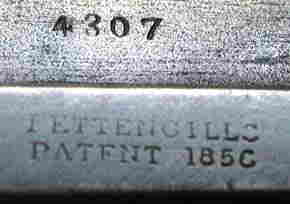
produced. The serial number on the government inspected arm featured in
this posting is 4307. Many of these arms were issued to the Army of the
Mississippi under General William S. Rosencrans and other Federal troops
in the West. They very likely were used at the Battle of Perryville, Kentucky
in 1862 and although a failure in the field and officially "discarded",
many undoubtedly served through the war or at least until the user thereof
could replace it with a more efficient side arm. It's front end design
was later incorporated into the Rodgers & Spencer .44 cal. single action
revolver, which, although the better of the two arms, arrived too late
for service in the war.
__________________________________________________________________________________________
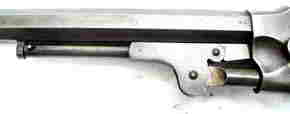
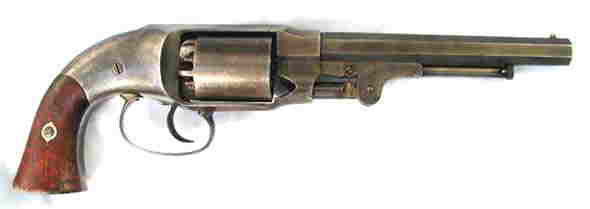
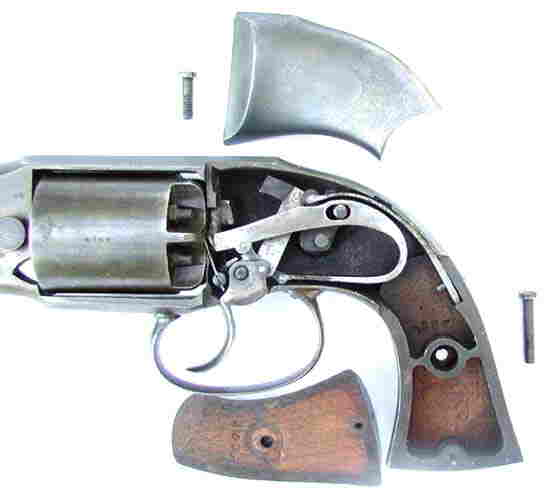
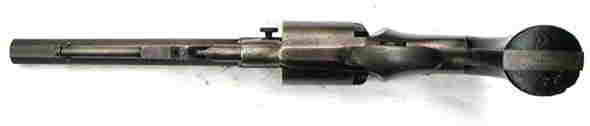
LEFT SIDE VIEW OF
THE PETTENGILL ARMY REVOLVER WITH THE COMBINATION LOADING LEVER / CYLINDER
ARBOR MECHANISM, THUMB SCREW AND CYLINDER REMOVED |
This double action or "self cocking"
six-shot concealed hammer weapon is .44 caliber and weighs 3 pounds.
The 7-1/2" barrel is rifled with 6 grooves. Measured diagonally from the
tip of the butt to the muzzle face it is 14-11/16" overall. The barrel
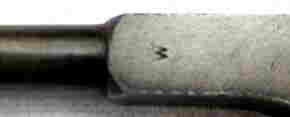
is unmarked except for the government sub inspector's marking of
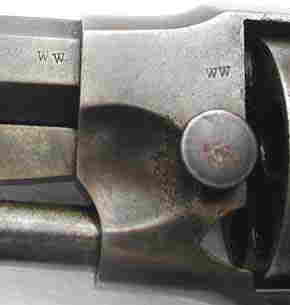
"WW" on the left flat just forward of the frame. The "WW" stampings are
those of William Walters, Armory Sub Inspector, 1862-1864. The same "WW"
stampings are also found on the left side of the frame above the 7/16"
diameter thumb screw and at the rear of the cylinder just forward of a
nipple well. A single "W" is also stamped on the left side of the combination
loading lever and cylinder arbor mechanism. Frame markings also include
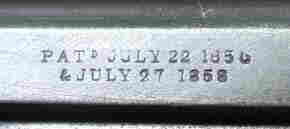
"PETTENGILLS / PATENT 1856" which is stamped in two lines on the top strap
to the right of the sight groove and the two line stamping of "PATD JULY
22 1856/ & JULY 27 1858" stamped on the top strap to the left of the
sight groove. Additionally, the bottom of the frame bears the stamping
of a non factory deeply incised "X" forward of the normal two line
stamping of "PATENTED / NOV. 4, 1862". It should be noted that earlier
production arms were stamped"RAYMOND & ROBITAILLE / PATENTED 1858"
on the top strap to the left of the sight groove and that some specimens
may also have had "PETTENGILLS PATENT" stamped on the barrel. Other markings
on this arm include the serial number "4307" which is stamped on the cylinder,
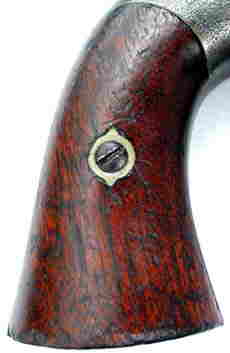
the butt strap and inside of both grips. The cartouche of the inspector's
initials is also stamped in the left grip. It is very difficult to read
but may be "CGC" for Charles G. Chandler, Armory Sub Inspector, 1861-1863.
|
"WW" INSPECTOR STAMPINGS
- LEFT FLAT OF BARREL, FRAME AND CYLINDER |
"W" STAMPING ON SIDE
OF COMBO LOADING LEVER / CYLINDER ARBOR |
CYLINDER SERIAL NUMBER
STAMPING "4307" & "PETTENGILLS PATENT 1856" TOP RIGHT FRAME STAMPING |
"PATD JULY 22 1856
& JULY 27 1858"
TOP LEFT FRAME
STAMPING |

INCISED "X"
& "PATENTED NOV. 4, 1862" STAMPING |
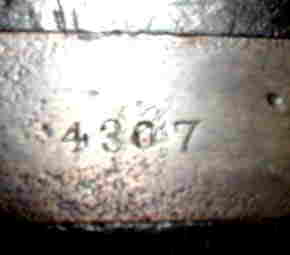
SERIAL NUMBER STAMPING
"4307" - BUTT STRAP |

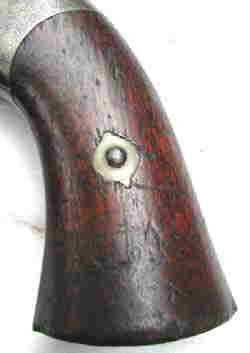
LEFT GRIP CARTOUCHE
"CGC"(?) |
__________________________________________________________________________________________
There is a brass cone front sight,
set on center, 3/8" from the muzzle face. The top of the frame is grooved
and provides a "V" rear sighting base. The malleable iron blued frame is
rounded behind the cylinder. A slight flaring of the metal provides a rather
thin recoil shield on both sides of the frame. A cone shaped loading groove
that passes entirely through the frame is wider on the right side than
the left. Loosening of the frame screw on the right side allows for removal
of the left rear frame plate and access to the "L" shaped hammer concealed
therein. A pull of the trigger revolves the cylinder, fires the weapon,
and cocks the hammer for the next shot. This unusual weapon was the only
American martial revolver of the Civil War made with an internal hammer.
Due to the delicate internal mechanism this arm, as previously mentioned,
proved a failure in the field and was replaced with more substantial side
arms such as the Remington and Starr revolvers. The six-shot blued cylinder
is 2-1/4" long. The nipples are recessed in open, separately partitioned,
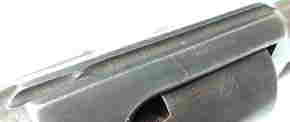
wells. The case-hardened loading lever has a plunger type latch that is
held by a catch mortised into the bottom of the barrel 1-1/2" from the
muzzle. The large sweeping oval trigger guard is blued as are the grip
straps that are integral with the frame. The black walnut two
piece grips are oil finished with the inspector's cartouche being stamped
into the left grip. It should be noted that the arms made for civilian
use have varnished grips.
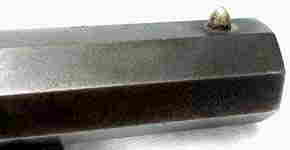
FRONT CONE SIGHT |
TOP SIGHTING GROOVE |
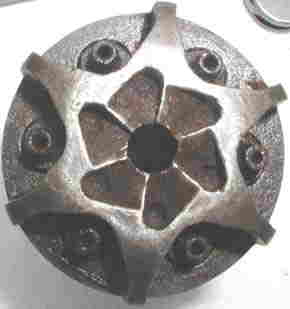
INTERNAL MECHANISM
(NOTE SERIAL NUMBER
"4307" INSIDE GRIPS) |
REAR CYLINDER VIEW |
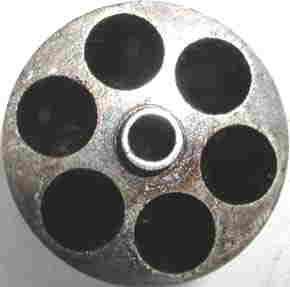
FRONT CYLINDER VIEW |
|
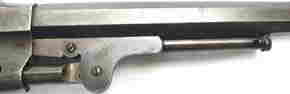
LEFT & RIGHT SIDE
VIEWS - BARREL & RAM ROD |
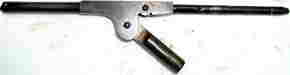
SIDE VIEW OF
COMBO RAM ROD & CYLINDER ARBOR |

TOP VIEW OF COMBO
RAM ROD & CYLINDER ARBOR
(NOTE LACK OF SERIAL
NUMBER) |

THUMB SCREW
(ALLOWS REMOVAL OF
COMBO RAM ROD & CYLINDER ARBOR) |

TOP OVERALL VIEW |
BOTTOM OVERALL VIEW |
__________________________________________________________________________________________
The next posting, Part 2 of 2
of this series, will feature the the Rogers And Spencer .44 Caliber Single
Action Percussion Army Revolver, which is a sibling to the Pettengill revolver
featured in this posting. The family resemblance is noticeable due to a
very similar front end.
Reference material for this posting
came from "U.S. Military Small Arms 1816-1865" by Robert M. Reilly, "Civil
War Small Arms", an American Rifleman Reprint - Articles "Civil War Revolvers
Part 1 & 2 of 2" by C. Meade Patterson & Cuddy De Marco, Jr. and
Norm Flayderman's "Flayderman's Guide To Antique American Firearms.....And
Their Values".
The photographs are all originals
of mine as are any assumptions or errors in this posting. The ace
webmaster is Reed Radcliffe, my son, who puts this all together for your
viewing.
GOD BLESS AMERICA!!
Dave Radcliffe
==============================================
Permission to reprint this article given by
Antique and Collectable Firearms and Militaria Headquarters
Serving Collectors and Students of Firearms and Military
History |
| Roll Crimping of Shotgun Shells by M.C. Ryder
SASS # 16346
If you have been around Cowboy Action Shooting for a while,
you've probably seen some roll crimped shells, especially if you know someone
who shoots black powder. Some modern factory shells, usually slug
loads, also use roll crimps. As the name implies, instead of the
standard star crimp, the edges of the shell have been rolled over to hold
in place a small cardboard piece called an overshot card that holds
the shot in. Here is a picture of a star crimped and rolled crimped
shell side by side for comparison.
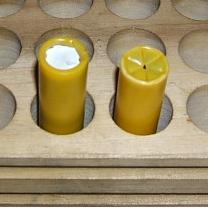
Star and Roll crimped shells. Note the overshot
card in the roll crimped shell. |
Now, you may be asking, why in the world would you want
to do this? Well, if you are into historical accuracy, this was the
way shotgun shells were originally crimped. The star crimp was developed
for ease of manufacture by automatic equipment. A more practical
reason is that less shell length is needed for a roll crimp, so you will
have more volume available for loading. This is especially good for black
powder, since black powder takes up more space than smokeless. I
do it on my black powder loads, even when I don't need the extra volume,
because then I can quickly identify which of my shells are black powder
(roll crimped) and which are smokeless (star crimped).
A roll crimp is also handy to use if you have to cut your shells down for
an old gun that requires shorter shells (I have a 10 gauge like that).
Making a roll crimp isn't hard. The first order
of business is to get some overshot cards. They are thin (0.030 inch)
, round pieces of cardboard, not expensive, 7 or 8 bucks for a thousand.
Most any supplier of shotshell reloading supplies will have them or can
get them. Many people use these even in a star crimped shell, because
it keeps the shot from falling out of the little hole you get if, like
me, you can't make perfect crimps. Load the shell as usual, and after
you drop the shot place the overshot wad on top of the shot column.
In the old days there were special tools for roll crimping
that looked kind of like a large pencil sharpener. You put the shell
in one end, turned a crank, and you got a roll crimp. I'm told that
these can sometimes be found at antique stores or yard sales. What
I use is the modern version of this, which is a tool made to be used with
a power drill. Here is a picture of mine, I have them in 10, 16 and
20 gauge.
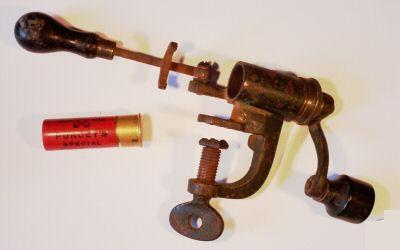
Old style roll crimper. |
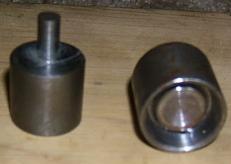
Roll crimper for power drill |
They are available for all gauges, from 410 thru 8 gauge.
They run around $25 or $30. You can use them in either a drill press
or a power hand drill. Chuck the tool into the drill, spin it up,
and apply to the end of the shell. It takes a little practice to
get an idea of how long and how hard to push. It doesn't take a lot
of pressure, and only a few seconds. I find that after a few
plastic shells I need to let the tool cool down, or I start melting the
plastic. The tool will also work on paper shells.
For holding the shells there are tools called hull vises,
if you already have one you can use it. You don't really need a special
tool, just a way to hold the shell so it won't rotate. The method I use
is a pair of vise grips adjusted so they have just enough pressure to hold
the shell, but not enough to put teeth marks in the plastic. You
don't need to hold them very tight, I've actually done it using my bare
hand, but I don't recommend that, your hand gets tired real fast.
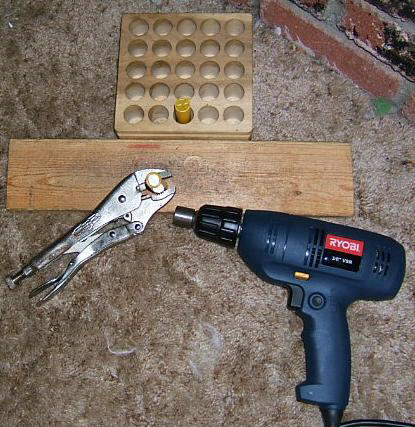
Ready to roll - grips and drill with crimper |
It is only fair to mention that there are a couple of
disadvantages to roll crimping. The most obvious is that it is more
time consuming than using your loader's star crimper. Also, while
I haven't done any experiments to prove this, I'm convinced that you get
fewer loads before the hull is worn out. The roll crimping
seems to work the plastic harder than a star crimp.
Here are two suppliers that I know sell roll crimping
tools. I'm sure there are others.
Precision Reloading - web site www.precisionreloading.com
Ballistic Products - web site www.ballisticproducts.com
END.
|
All articles submitted to the "Brimstone
Gazette" are the property of the author, used with their expressed permission.
The Brimstone Pistoleros are not
responsible for any accidents which may occur from use of loading
data, firearms information, or recommendations published on the Brimstone
Pistoleros web site. |
|