A Ko-hyoteki-class submarine from
Wikipedia
| The Type A Ko-hyoteki (K-hyteki k-gata, Target
'A', Type 'A') class was a class of Japanese midget submarines (Ko-hyoteki)
used during World War II. They had hull numbers but no names. For simplicity,
they are most often referred to by the hull number of the mother submarine.
Thus, the midget carried by ?-16 was known as I-16's boat, or "I-16tou."
This class was followed by: Type B (K-hyteki otsu-gata),
Type C (K-hyteki hei-gata), and Type D ( K-hyteki tei-gata), the last one
better known as Koryu
History
Fifty were built. The "A Target" name was assigned
as a ruse: If their design was prematurely discovered by Japan's foes,
the Japanese Navy could insist that the vessels were battle practice targets.
They were also called "Tubes" (Tou) or "Target" ( Teki, abbreviation of
'Hyteki) and other slang names.
The first two, No.1 and No.2, were used only in
testing. They did not have conning towers, which were added to the later
boats for stability underwater.
No.19 was launched by I-24 at Pearl Harbor. Most
of the other fifty are unaccounted for, although three were captured in
Sydney (Australia), and others in Guam, Guadalcanal, and Kiska Island,
accounting for some of the other hull numbers.
The submarines were each armed with two 450 mm
torpedoes in muzzle-loading tubes one above the other on the port bow.
In the Pearl |
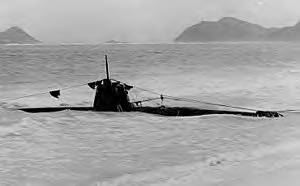
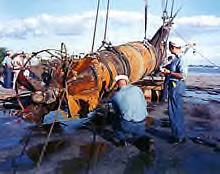
Type A Ko-hyoteki class submarine,
No.19, grounded in the surf on Oahu after the attack on Pearl Harbor, December
1941
| Completed: |
101 |
| |
1 first prototype |
| |
2 second prototype |
| |
46 Type A |
| |
5 Type B |
| |
47 Type C |
| Speed: |
23 knots surfaced
19 knots submerged |
| Range: |
100 nm @ 3 kn
80 nm @ 6 kn
18 nm @ 19 kn |
| Depth: |
98 ft |
| Compliment: |
2 |
|
|
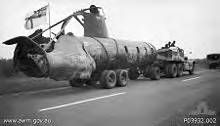
Japanese Landing ship No.5 carried
Type 'C' No.69. |
Harbor attack, the specially designed Type 97
torpedo was used, but problems with the oxygen flasks meant that all later
attacks used a different torpedo. Some have stated that a version of the
Type 91 torpedo, designed for aircraft launching, was used, but other reports
indicate that the Type 97 torpedo was modified to the Type 98, otherwise
known as the Type 97 special. There is no definitive information that the
Type 91 was used. The Type 98 was later supplanted by the Type 02 torpedo.
There was also a demolition charge which it has been suggested was large
enough to enable the submarine to be used as a suicide weapon, but there
is no evidence that it was ever used as one.
Each submarine had a crew of two men. A junior
officer conned the boat while a petty officer manipulated valves and moved
ballast to control trim and diving. |
Pearl Harbor attack
| Five of these boats participated in the Pearl
Harbor attack, with two actually making it into the harbor. Of the five
used at Pearl Harbor, No.19 was captured where it grounded on the east
side of Oahu. During World War II, No.19 was put on tour across the United
States to help sell War Bonds. Now a U.S. National Historic Landmark, No.19
is an exhibit at the National Museum of the Pacific War in Fredericksburg,
Texas.
A second Pearl Harbor midget submarine, No.18,
was located by U.S. Navy divers off Keehi Lagoon east of the Pearl Harbor
entrance on 13 June 1960. The submarine had been damaged by a depth charge
attack and abandoned by its crew before it could fire its torpedoes. This
submarine was restored and placed on display at the Imperial Japanese Naval
Academy on 15 March 1962.
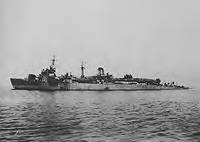
The midget submarine attacked by Ward (DD-139)
at 6:37 a.m. on 7 December, No.20, was located in 400 meters (1,312 feet)
of water five miles outside Pearl Harbor by a University of Hawaii research
submersible on 28 August 2002.
A fourth submarine, No.22, entered the harbor
and fired its torpedoes at Curtiss (AV-4) and Monaghan (DD-354). Both of
those torpedoes missed and are believed to have hit a dock at Pearl City
and the shore of Ford Island. This submarine was sunk by Monaghan at 8:43
a.m. on 7 December and later recovered and used as fill during construction
of a new landside pier at the Pearl Harbor submarine base. The hulk was
uncovered again in 1952 but was so badly corroded by chlorine gas from
the electrical batteries that it was again reburied at the same location.
The crew's remains are still entombed in the submarine. |
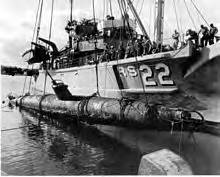
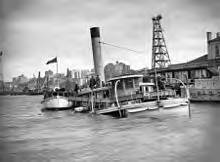
Raising of midget submarine from
Keehi Lagoon by USS Current (ARS-22) in 1960
Japanese Type A Midget Submarine
recovered in 1960 off Pearl Harbor, HI.
|
In 2009, a research team assembled by PBS Nova
positively identified the remains of a midget sub found outside the Pearl
Harbor entrance as being the last of the 5 Ko-Hyoteki that participated
in the December 7, 1941, attack. It was discovered in salvage from the
wreckage of the West Loch Disaster of 1944, dumped three miles south of
Pearl Harbor. Secret war records show that submarine crews had been ordered
to scuttle their subs after the attack and provisions were made to recover
stranded crews. It is believed the fifth sub successfully entered Pearl,
fired on Battleship Row, and escaped to the relative quiet of neighbouring
West Loch, where it was scuttled by the crew. When a series of explosions
sank an amphibious fleet being assembled in the Loch in 1944, the remains
of the sub were collected and dumped in the subsequent salvage operation,
which was kept classified as secret until 1960. The torpedo tubes in the
bow section were empty, indicating that the fifth midget had fired its
torpedoes prior to being scuttled. A photograph taken from a Japanese plane
during the Pearl Harbor attack appears to show a midget submarine inside
the harbor firing torpedoes at Battleship Row. This new evidence suggests
that the capsizing of the USS Oklahoma may have been accelerated by a torpedo
hit from a submarine-launched torpedo, the warhead of which was roughly
twice the power of that carried by the air-dropped torpedoes. In the photo,
where the torpedoes' paths had supposedly started, were sprays that indicated
a midget-submarine rocking up and down due to the force of the torpedo
being launched, causing the propellers of the stern to be exposed, kicking
up clouds of water spray. A war time report from Admiral Nimitz confirmed
the recovery of dud torpedoes of the type employed by the midget submarines.
This discovery is covered in PBS Nova television program Killer Subs in
Pearl Harbor and companion website, I-16tou.com.
Japanese midget submarine attacks on Sydney
| On the night of 29 May 1942, five large Japanese
submarines positioned themselves 56 kilometres north-east of Sydney Heads.
At 3 a.m. the next day one of the submarines launched a reconnaissance
aircraft. After circling Sydney Harbour the aircraft returned to its submarine,
reporting the presence of 'battleships and cruisers' moored in the harbour.
The flotilla's commanding officer decided to attack the harbour with midget
submarines the next night. The next day the five submarines approached
to within 11 kilometres of Sydney Heads, and at about 4:30 p.m. they released
three midget submarines, which then began their approach to Sydney Harbour.
The outer-harbour defences detected the entry
of the first midget submarine, No.14, at about 8 p.m., but it was not identified
until it became entangled in an anti-torpedo net that was suspended between
George's Head and Green Point. Before HMAS Yarroma was able to open fire,
the submarine's two crew members destroyed their vessel with demolition
charges and killed themselves.
The second submarine, No.24b, entered the harbour
at about 9.48 p.m. and headed west towards the Sydney Harbour Bridge, causing
a general alarm to be issued by the Naval Officer in Charge, Sydney. About
200 metres from Garden Island the submarine was fired on by the heavy cruiser
Chicago (CA-29). The submarine then fired its two torpedoes at the cruiser.
One torpedo ran ashore on Garden Island, but failed to explode. The other
passed under the Dutch submarine K9 and struck the harbour bed beneath
the depot ship HMAS Kuttabul where it exploded, killing 21 sailors |
HMAS Kuttabul after sinking.
The two midget submarines sunk
in Sydney Harbour were used to construct a composite midget submarine which
toured Australia during the war.
|
(19 Royal Australian Navy and 2 Royal Navy). The
submarine then slipped out of the harbour, its mission complete, and disappeared.
Its wreck was located, about 30 km north of the harbour and 5 km to seaward,
in November 2006. It is now protected as a war grave.
The third submarine, No.21, was sighted by HMAS
Yandra at the entrance to the harbour and was depth-charged. Some four
hours later, having recovered, it entered the harbour, but it was subsequently
attacked with depth charges and sunk in Taylor Bay by vessels of the Royal
Australian Navy. Both members of the submarine's crew committed suicide.
The two submarines that were recovered were identical,
and their remains were used to reconstruct a complete submarine, which
toured New South Wales, Victoria and South Australia before being delivered
to the Australian War Memorial in Canberra in 1943, where it remains on
display.
Japanese midget submarine attacks on Madagascar
Main article: Battle of Madagascar
On the 29 May 1942, the Japanese submarines I-10,
I-16 and I-20 arrived on Madagascar. I-10's reconnaissance plane spotted
Revenge-class battleship HMS Ramillies at anchor in Diego Suarez harbor
but the plane was spotted and Ramillies changed her berth. I-20 and I-16
launched two midget submarines, one of which managed to enter the harbor
and fired two torpedoes while under depth charge attack from two corvettes.
One torpedo seriously damaged Ramillies, while the second sank the 6,993
ton oil tanker British Loyalty (later refloated). Ramillies was later repaired
in Durban and Plymouth.
The crew of one of the submarines, Lieutenant
Saburo Akieda and Petty Officer Masami Takemoto, beached their submarine
(No.20b) at Nosy Antalikely and moved inland towards their pick-up point
near Cape Amber. They were informed upon when they bought food at a village
and both were killed in a firefight with Royal Marines three days later.
The second midget submarine, No.16b, was lost at sea and the body of one
of its crew was found washed ashore a day later.
Characteristics
| Type |
First prototype |
Second prototype (Prod. No. 12) |
Type 'A' (Prod. No. 353) |
Type 'B' (Prod. No. 4953) |
Type 'C' (Prod. No. 54100) |
| Displacement (Submerged) |
41.525 long tons (42 t) |
44.150 long tons (45 t) |
46 long tons (47 t) |
47 long tons (48 t) |
49.09 long tons (50 t) |
| Length (overall) |
23.3 m (76 ft 5 in) |
23.9 m (78 ft 5 in) |
23.9 m (78 ft 5 in) |
24.9 m (81 ft 8 in) |
24.9 m (81 ft 8 in) |
| Beam |
1.82 m (5 ft 11.8in) |
1.85 m (6 ft 1 in) |
1.85 m (6 ft 1 in) |
1.85 m (6 ft 1 in) |
1.88 m (6 ft 2 in) |
| Draft |
3.07 m (10 ft 1 in) |
3.1 m (10 ft 2 in) |
3.4 m (11 ft 2 in) |
3.4 m (11 ft 2 in) |
3.43 m (11 ft 3 in) |
| Draught |
1.854 m (6 ft 1 in) |
1.88 m (6 ft 2 in) |
1.88 m (6 ft 2 in) |
1.85 m (6 ft 1 in) |
1.88 m (6 ft 2 in) |
| Power plant and shaft |
224 × Type 'B' special rechargeable batteries,
electric motor (600 bhp),
single shaft,
contra-rotating propellers |
224 × Type 'D' special rechargeable batteries,
electric motor (600 bhp),
single shaft,
contra-rotating propellers |
224 × Type 'D' special rechargeable batteries,
electric motor (600 bhp),
single shaft,
contra-rotating propellers |
224 × Type 'D' special rechargeable batteries,
electric motor (600 bhp),
1 × electric generator (40 bhp),
single shaft,
contra-rotating propellers |
208 × Type 'D' special rechargeable batteries,
electric motor (600 bhp),
1 × electric generator (40 bhp),
single shaft,
contra-rotating propellers |
| Speed Surfaced |
no data |
no data |
no data |
6 knots |
6 knots |
| Speed Submerged |
25 knots |
25 knots |
19.0 knots |
19.0 knots |
18.5 knots |
| Range Surfaced |
no data |
no data |
no data |
500 nmi at 6 knots |
500 nmi at 6 knots |
| Range Submerged |
no data |
no data |
15.8 nmi at 9 knots |
15.8 nmi at 9 knots |
15.4 nmi at 9 knots |
|